
| 일 | 월 | 화 | 수 | 목 | 금 | 토 |
|---|---|---|---|---|---|---|
| 1 | 2 | 3 | ||||
| 4 | 5 | 6 | 7 | 8 | 9 | 10 |
| 11 | 12 | 13 | 14 | 15 | 16 | 17 |
| 18 | 19 | 20 | 21 | 22 | 23 | 24 |
| 25 | 26 | 27 | 28 | 29 | 30 | 31 |
- 공부
- 엔진심화
- 유니티
- 3d 모델링 ai
- rodin ai
- 배경모델링
- 노말맵깨짐
- 메가스캔 유료화
- 셰이더그래프
- 프로젝트
- 노말맵
- 3d 모델을 로드할 수 없음
- 방학셰이더스터디
- 게임제작
- 3D
- 스무딩그룹
- 3ds Max
- 메가스캔
- 모작
- normal map
- 3d 뷰어
- 재질
- UE5
- fbx 보안
- 모델링 ai
- fbx
- 게임개발
- fbx 안열림
- 레퍼런스 프로그램
- 게임그래픽
- Today
- Total
베개발
자료번역) Plant modeling for video games 본문
원문 https://www.artstation.com/artwork/mgB6a
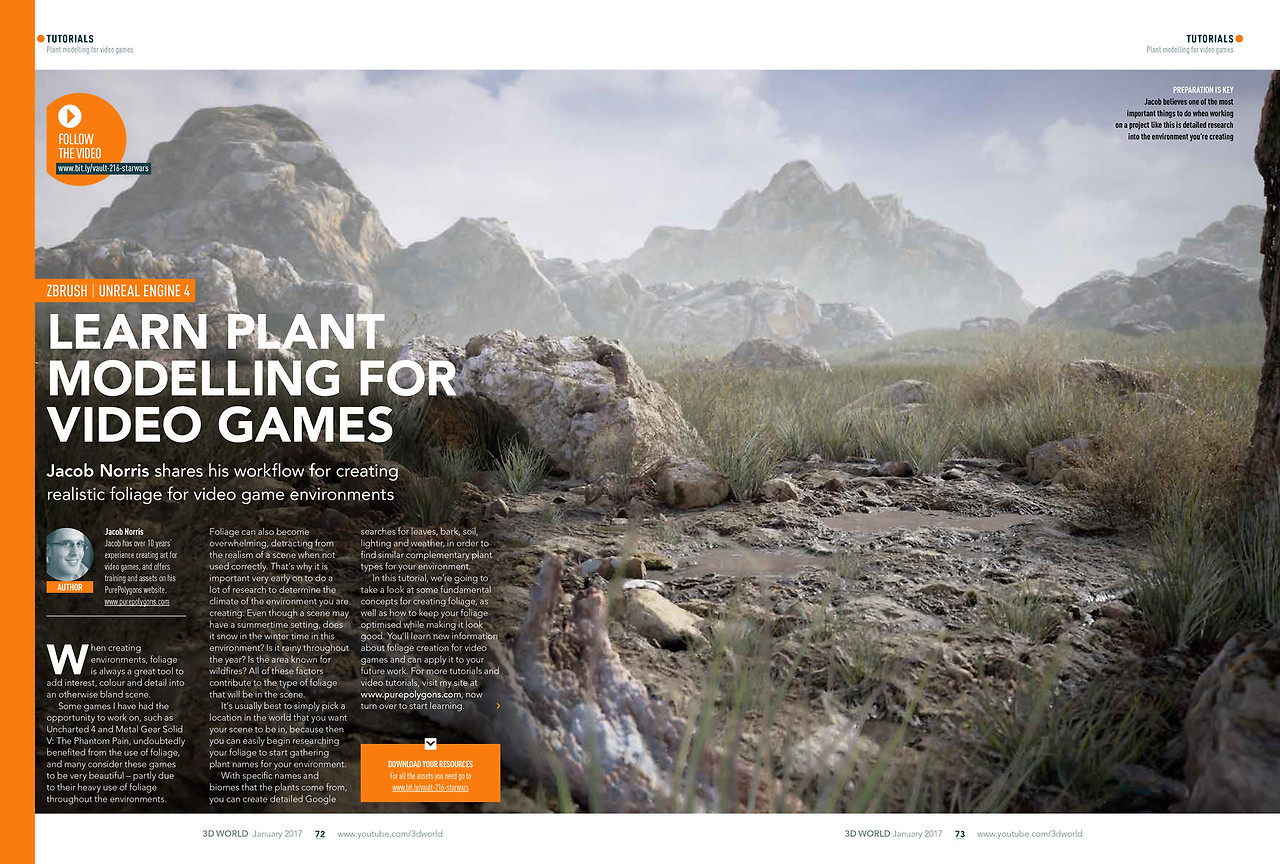
비디오 게임을 위한 식물 모델링 배우기
Jacob Norris가 비디오 게임 환경을 위한 사실적인 식물 제작 워크플로우를 공유합니다
환경을 제작할 때, 식물은 자칫 단조로울 수 있는 장면에 흥미, 색감, 디테일을 더하는 훌륭한 도구입니다. 제가 참여할 기회가 있었던 언차티드 4(Uncharted 4)나 메탈 기어 솔리드 V: 더 팬텀 페인(Metal Gear Solid V: The Phantom Pain)과 같은 일부 게임들은 식물의 사용으로 확실히 이점을 얻었으며, 많은 사람들이 이 게임들을 매우 아름답다고 생각하는데, 이는 부분적으로 환경 전반에 걸쳐 식물을 많이 사용했기 때문입니다.
식물은 또한 잘못 사용될 경우 압도적인 느낌을 주어 장면의 사실성을 저해할 수도 있습니다. 그렇기 때문에 제작하려는 환경의 기후를 결정하기 위해 아주 초기 단계부터 많은 조사를 하는 것이 중요합니다. 장면이 여름 배경이라 할지라도, 이 환경에서는 겨울에 눈이 오나요? 일년 내내 비가 많이 오나요? 이 지역은 산불로 유명한가요? 이러한 모든 요인들이 장면에 포함될 식물의 종류를 결정하는 데 기여합니다.
일반적으로는 장면의 배경으로 삼고 싶은 실제 세계의 장소를 선택하는 것이 가장 좋습니다. 그렇게 하면 해당 환경에 맞는 식물 이름을 수집하기 위해 식물 조사를 쉽게 시작할 수 있기 때문입니다. 식물의 구체적인 이름과 해당 식물이 자라는 생물 군계(biome)를 알면, 잎, 나무껍질, 흙, 조명 및 날씨에 대한 상세한 구글 검색을 통해 환경에 어울리는 보완적인 식물 유형을 찾을 수 있습니다.
이 튜토리얼에서는 식물 제작의 몇 가지 기본 개념과 더불어, 식물을 보기 좋게 만들면서도 최적화 상태를 유지하는 방법에 대해 알아볼 것입니다. 비디오 게임을 위한 식물 제작에 대한 새로운 정보를 배우고 이를 향후 작업에 적용할 수 있습니다. 더 많은 튜토리얼과 비디오 튜토리얼을 보려면 제 사이트 http://www.purepolygons.com 을 방문하세요. 이제 학습을 시작해 보세요.
LEARN PLANT MODELLING FOR VIDEO GAMES
- Jacob Norris shares his workflow for creating realistic foliage for video game environments
When creating environments, foliage is always a great tool to add interest, colour and detail into an otherwise bland scene. Some games I have had the opportunity to work on, such as Uncharted 4 and Metal Gear Solid V: The Phantom Pain, undoubtedly benefited from the use of foliage, and many consider these games to be very beautiful – partly due to their heavy use of foliage throughout the environments.
Foliage can also become overwhelming, detracting from the realism of a scene when not used correctly. That’s why it is important very early on to do a lot of research to determine the climate of the environment you are creating. Even though a scene may have a summertime setting, does it snow in the winter time in this environment? Is it rainy throughout the year? Is the area known for wildfires? All of these factors contribute to the type of foliage that will be in the scene.
It’s usually best to simply pick a location in the world that you want your scene to be in, because then you can easily begin researching your foliage to start gathering plant names for your environment. With specific names and biomes that the plants come from, you can create detailed Google searches for leaves, bark, soil, lighting and weather, in order to find similar complementary plant types for your environment.
In this tutorial, we’re going to take a look at some fundamental concepts for creating foliage, as well as how to keep your foliage optimised while making it look good. You’ll learn new information about foliage creation for video games and can apply it to your future work. For more tutorials and video tutorials, visit my site at http://www.purepolygons.com, now turn over to start learning.
01 함께 어울리는 식물 찾기
식물 군계(biome)를 찾는 것은 모든 요소가 실제로 조화를 이룰 때 환경의 사실성을 확실히 높여줍니다. 이는 전체 장면에 대한 청사진을 구상하고, 최종 렌더의 일관성, 조화, 구도에 드러날 또 다른 차원의 디테일을 추가하는 데 도움이 될 수 있습니다. 자신이 설정한 군계를 통해 특정 지역 내에서 자라는 모든 식물을 파악할 수 있습니다. 이를 통해 장면에 어떤 색상이 들어갈지, 식물이 환경의 스토리를 어떻게 보완할 수 있을지 파악하고 모든 것을 하나로 묶는 올바른 방향으로 나아갈 수 있습니다.
02 자료는 어디서 수집할 수 있나요?
프로젝트를 위해 직접 나가서 사진, 텍스처, 레퍼런스를 수집하는 것이 항상 가장 좋습니다. 만약 그럴 수 없다면, 검색 엔진도 분명 좋은 대안입니다. 개인적으로는 직접 현장에 가서 눈으로 확인하는 것이 항상 가장 좋은 방법이라고 생각합니다. 이를 통해 모든 각도에서 환경을 볼 수 있고 원하는 레퍼런스를 정확하게 포착할 수 있습니다. 그래서 저는 최근 유럽의 여러 다른 장소에서 촬영한 일련의 사진 레퍼런스 이미지, 텍스처, 포토그래메트리(photogrammetry) 작업을 마쳤습니다. 이곳에서 이러한 군계, 기후, 환경 중 일부를 포착했습니다. 이 자료들은 이미 제 환경 아트워크 작업에 도움이 되고 있으며, 관심이 있으시다면 제 웹사이트와 검로드(Gumroad) 페이지에서 PurePolygons라는 이름으로 찾아보실 수 있습니다.
조사하세요
사람들은 올바르게 보이는 것은 무시하는 경향이 있습니다 – 아주 좋죠! 무언가 잘못되어 보일 때만 눈에 띄게 됩니다. 그렇기 때문에 조사가 중요합니다. 환경에 설득력을 부여하고 싶다면 이 모든 '것들’이 중요합니다.
03 이 모든 것이 필요한가요?
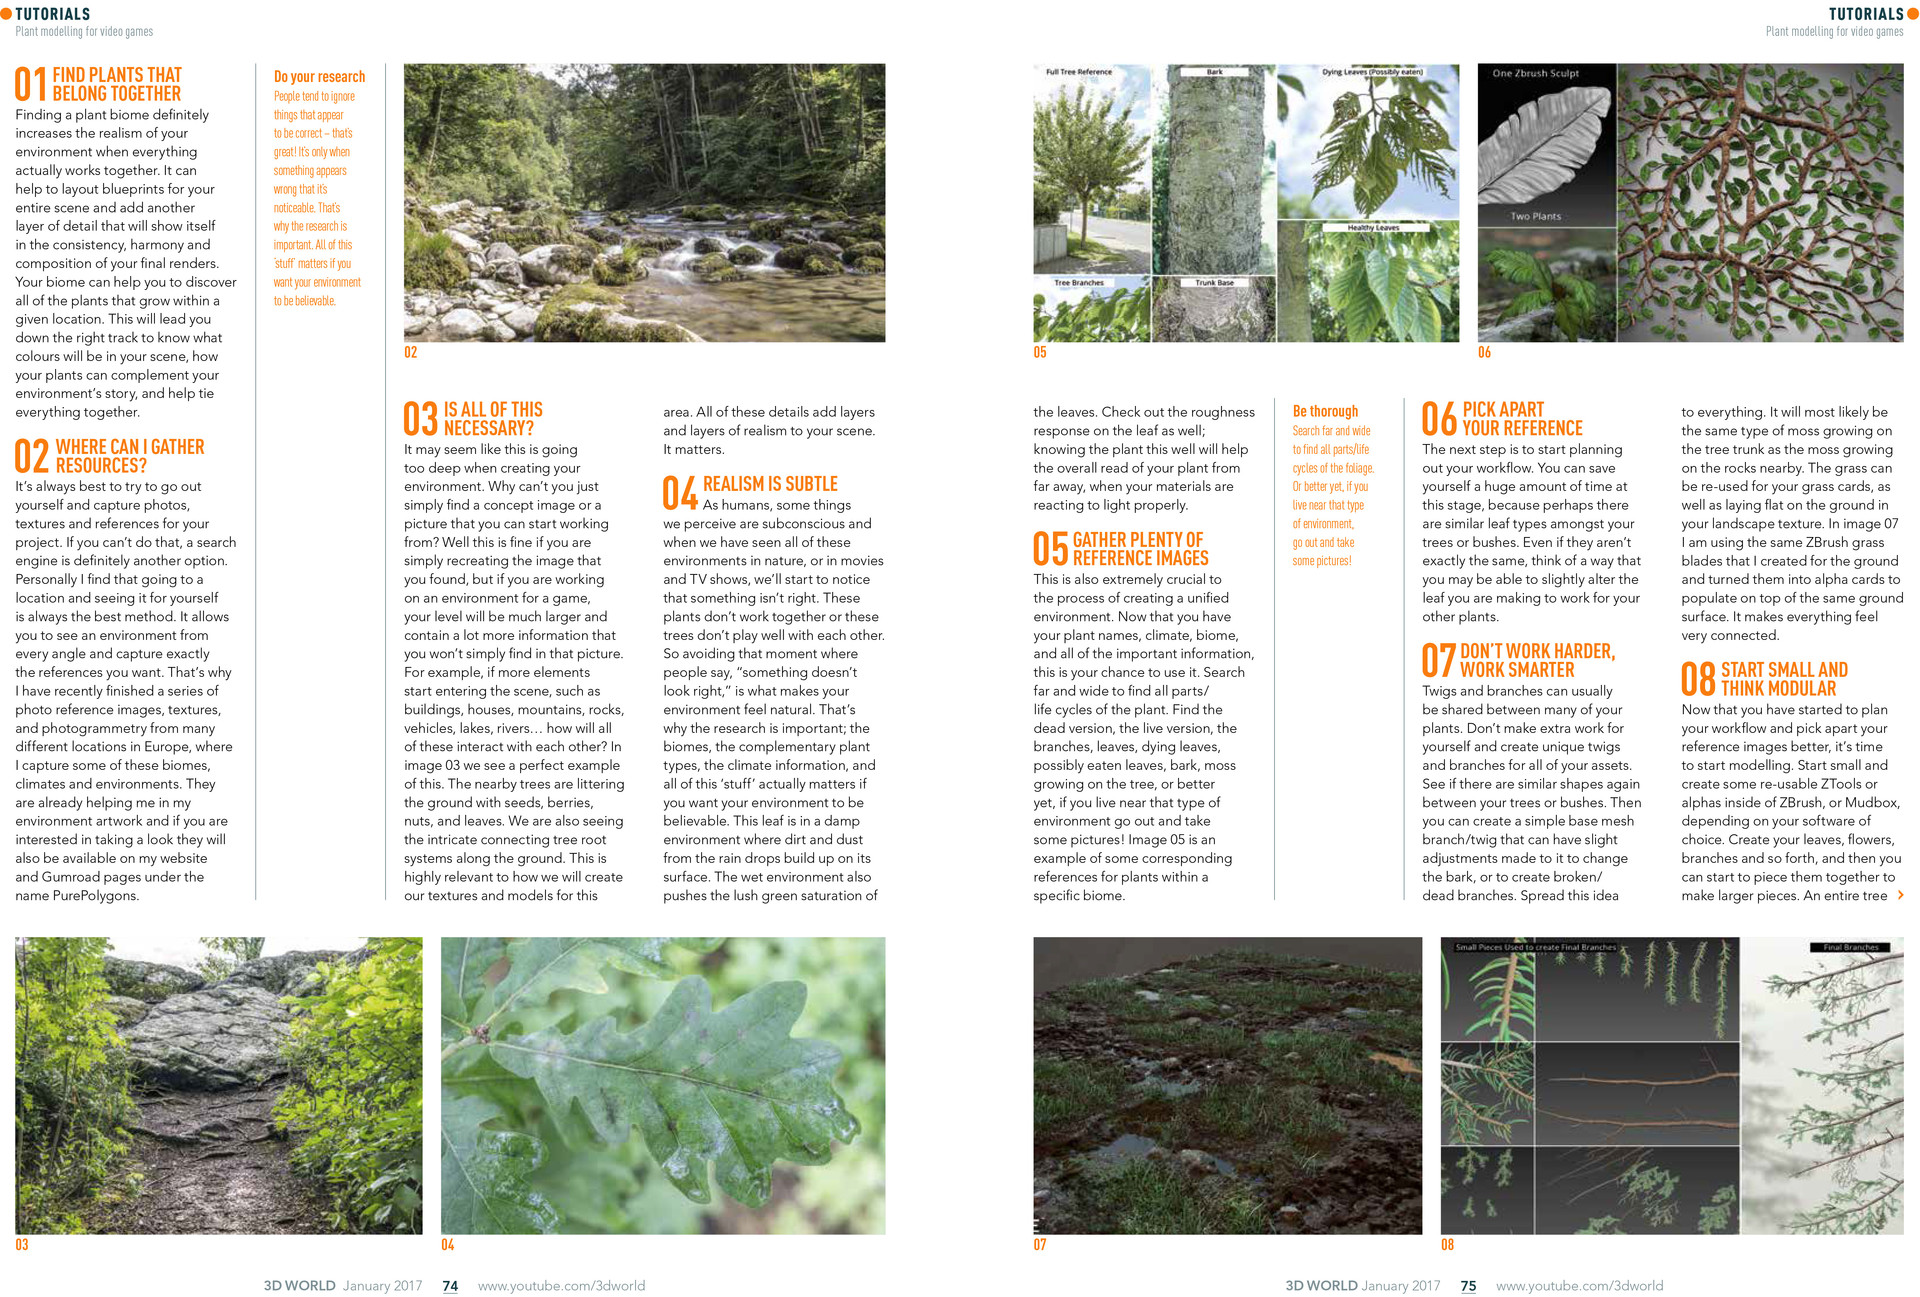
환경을 제작할 때 이 과정이 너무 깊이 들어가는 것처럼 보일 수 있습니다. 단순히 작업 시작의 기반이 될 컨셉 이미지나 사진을 찾으면 안 되는 걸까요? 찾은 이미지를 단순히 재현하는 것이라면 괜찮습니다. 하지만 게임 환경 작업을 하고 있다면, 레벨은 훨씬 더 크고 해당 사진 한 장에서는 찾을 수 없는 훨씬 더 많은 정보를 포함하게 될 것입니다. 예를 들어, 건물, 집, 산, 바위, 차량, 호수, 강과 같은 더 많은 요소가 장면에 추가되기 시작하면 이 모든 것들이 서로 어떻게 상호작용할까요? 이미지 03에서 이에 대한 완벽한 예를 볼 수 있습니다. 근처의 나무들은 씨앗, 열매, 견과류, 잎사귀들로 땅을 뒤덮고 있습니다. 또한 땅을 따라 복잡하게 연결된 나무뿌리 시스템도 볼 수 있습니다. 이는 이 지역의 텍스처와 모델을 만드는 방식과 매우 관련이 깊습니다. 이 모든 디테일은 장면에 겹겹이 사실성을 더합니다. 중요한 문제입니다.
04 사실성은 미묘합니다
인간으로서 우리가 인지하는 것 중 일부는 잠재의식적이며, 자연이나 영화, TV 쇼에서 이러한 모든 환경을 보았을 때, 우리는 무언가 잘못되었다는 것을 알아차리기 시작할 것입니다. 이 식물들은 서로 어울리지 않거나, 이 나무들은 서로 조화를 이루지 못한다고요. 따라서 사람들이 "뭔가 이상해 보인다"라고 말하는 순간을 피하는 것이 환경을 자연스럽게 느끼게 만드는 것입니다. 그렇기 때문에 조사가 중요합니다. 군계, 서로 보완적인 식물 유형, 기후 정보, 그리고 이 모든 '것들’은 환경에 설득력을 부여하고 싶다면 실제로 중요합니다. 이 잎은 축축한 환경에 있으며, 빗방울로 인한 흙과 먼지가 표면에 쌓여 있습니다. 젖은 환경은 또한 잎의 무성한 녹색 채도를 더욱 강조합니다. 잎의 거칠기(roughness) 반응도 확인해 보세요. 식물을 이렇게 잘 아는 것은 멀리서 볼 때, 재질(material)이 빛에 제대로 반응할 때 식물의 전반적인 인식을 돕습니다.
05 충분한 레퍼런스 이미지 수집하기
이 단계 역시 통일된 환경을 만드는 과정에서 매우 중요합니다. 이제 식물 이름, 기후, 바이옴(생물 군계) 및 모든 중요한 정보를 확보했으므로, 이를 활용할 차례입니다. 식물의 모든 부위/생애 주기를 찾기 위해 폭넓게 검색하세요. 죽은 모습, 살아있는 모습, 가지, 잎, 시들어가는 잎, 벌레 먹은 잎, 나무껍질, 나무에 자라는 이끼 등을 찾아보세요. 더 좋은 방법은, 만약 해당 유형의 환경 근처에 살고 있다면 직접 나가서 사진을 찍는 것입니다! 이미지 05는 특정 바이옴 내 식물에 대한 해당 레퍼런스의 예시입니다.
철저하게 하세요
폴리지(식물)의 모든 부위/생애 주기를 찾기 위해 폭넓게 검색하세요. 더 좋은 방법은, 해당 환경 근처에 살고 있다면 직접 나가서 사진을 찍는 것입니다!
06 레퍼런스 자세히 분석하기
다음 단계는 작업 흐름(워크플로우)을 계획하기 시작하는 것입니다. 이 단계에서 엄청난 시간을 절약할 수 있습니다. 예를 들어, 여러분의 나무나 덤불 사이에 비슷한 유형의 잎이 있을 수 있습니다. 정확히 같지 않더라도, 만들고 있는 잎을 약간 수정하여 다른 식물에도 적용할 수 있는 방법을 생각해 보세요.
07 더 힘들게 일하지 말고, 더 스마트하게 일하세요
잔가지와 가지는 보통 여러 식물에서 공유될 수 있습니다. 모든 에셋에 대해 고유한 잔가지와 가지를 만들어 스스로 추가 작업을 만들지 마세요. 여러분의 나무나 덤불 사이에 다시 한번 비슷한 모양이 있는지 확인해 보세요. 그런 다음 나무껍질을 바꾸거나 부러지거나 죽은 가지를 만들기 위해 약간의 수정을 가할 수 있는 간단한 베이스 메시(base mesh) 가지/잔가지를 만들 수 있습니다. 이 아이디어를 다른 영역에도 적용해 보세요. 이 모든 디테일은 장면에 겹겹이 사실감을 더합니다. 중요합니다.
08 작게 시작하고 모듈식으로 생각하기
이제 작업 흐름을 계획하고 레퍼런스 이미지를 더 잘 분석하기 시작했으니, 모델링을 시작할 시간입니다. 선택한 소프트웨어(ZBrush 또는 Mudbox)에 따라 작게 시작하여 재사용 가능한 ZTool이나 알파(alpha)를 만드세요. 잎, 꽃, 가지 등을 만든 다음, 이것들을 조합하여 더 큰 조각을 만들 수 있습니다. 단 몇 개의 에셋을 스마트한 방식으로 사용하여 전체 나무 캐노피(수관)의 가지/잎을 구축할 수 있습니다. 이미지 08은 Colin Valek이 PurePolygons의 Procedural Nature Pack Vol.2에서 이 소나무 가지를 위해 개별 잎을 만들기 시작한, 작게 시작하는 예시입니다. 재사용할 수 있는 간단한 조각들을 가지고 나면, 그 첫 번째 작은 소나무 잎에서 시작하여 더 큰 조각으로 확장하기가 매우 쉬워집니다!
01 find plants that belong together
Finding a plant biome definitely increases the realism of your environment when everything actually works together. It can help to layout blueprints for your entire scene and add another layer of detail that will show itself in the consistency, harmony and composition of your final renders. Your biome can help you to discover all of the plants that grow within a given location. This will lead you down the right track to know what colours will be in your scene, how your plants can complement your environment’s story, and help tie everything together.
02 where can i gather resources?
It’s always best to try to go out yourself and capture photos, textures and references for your project. If you can’t do that, a search engine is definitely another option. Personally I find that going to a location and seeing it for yourself is always the best method. It allows you to see an environment from every angle and capture exactly the references you want. That’s why I have recently finished a series of photo reference images, textures, and photogrammetry from many different locations in Europe, where I capture some of these biomes, climates and environments. They are already helping me in my environment artwork and if you are interested in taking a look they will also be available on my website and Gumroad pages under the name PurePolygons.
Do your research
People tend to ignore things that appear to be correct – that’s great! It’s only when something appears wrong that it’s noticeable. That’s why the research is important. All of this ‘stuff’ matters if you want your environment to be believable.
03 is all of this necessary?
It may seem like this is going too deep when creating your environment. Why can’t you just simply find a concept image or a picture that you can start working from? Well this is fine if you are simply recreating the image that you found, but if you are working on an environment for a game, your level will be much larger and contain a lot more information that you won’t simply find in that picture. For example, if more elements start entering the scene, such as buildings, houses, mountains, rocks, vehicles, lakes, rivers how will all of these interact with each other? In image 03 we see a perfect example of this. The nearby trees are littering the ground with seeds, berries, nuts, and leaves. We are also seeing the intricate connecting tree root systems along the ground. This is highly relevant to how we will create our textures and models for this area. All of these details add layers and layers of realism to your scene. It matters.
04 realism is subtle
As humans, some things we perceive are subconscious and when we have seen all of these environments in nature, or in movies and TV shows, we’ll start to notice that something isn’t right. These plants don’t work together or these trees don’t play well with each other. So avoiding that moment where people say, “something doesn’t look right,” is what makes your environment feel natural. That’s why the research is important; the biomes, the complementary plant types, the climate information, and all of this ‘stuff’ actually matters if you want your environment to be believable. This leaf is in a damp environment where dirt and dust from the rain drops build up on its surface. The wet environment also pushes the lush green saturation of the leaves. Check out the roughness response on the leaf as well; knowing the plant this well will help the overall read of your plant from far away, when your materials are reacting to light properly.
09 ZBrush는 당신의 친구입니다
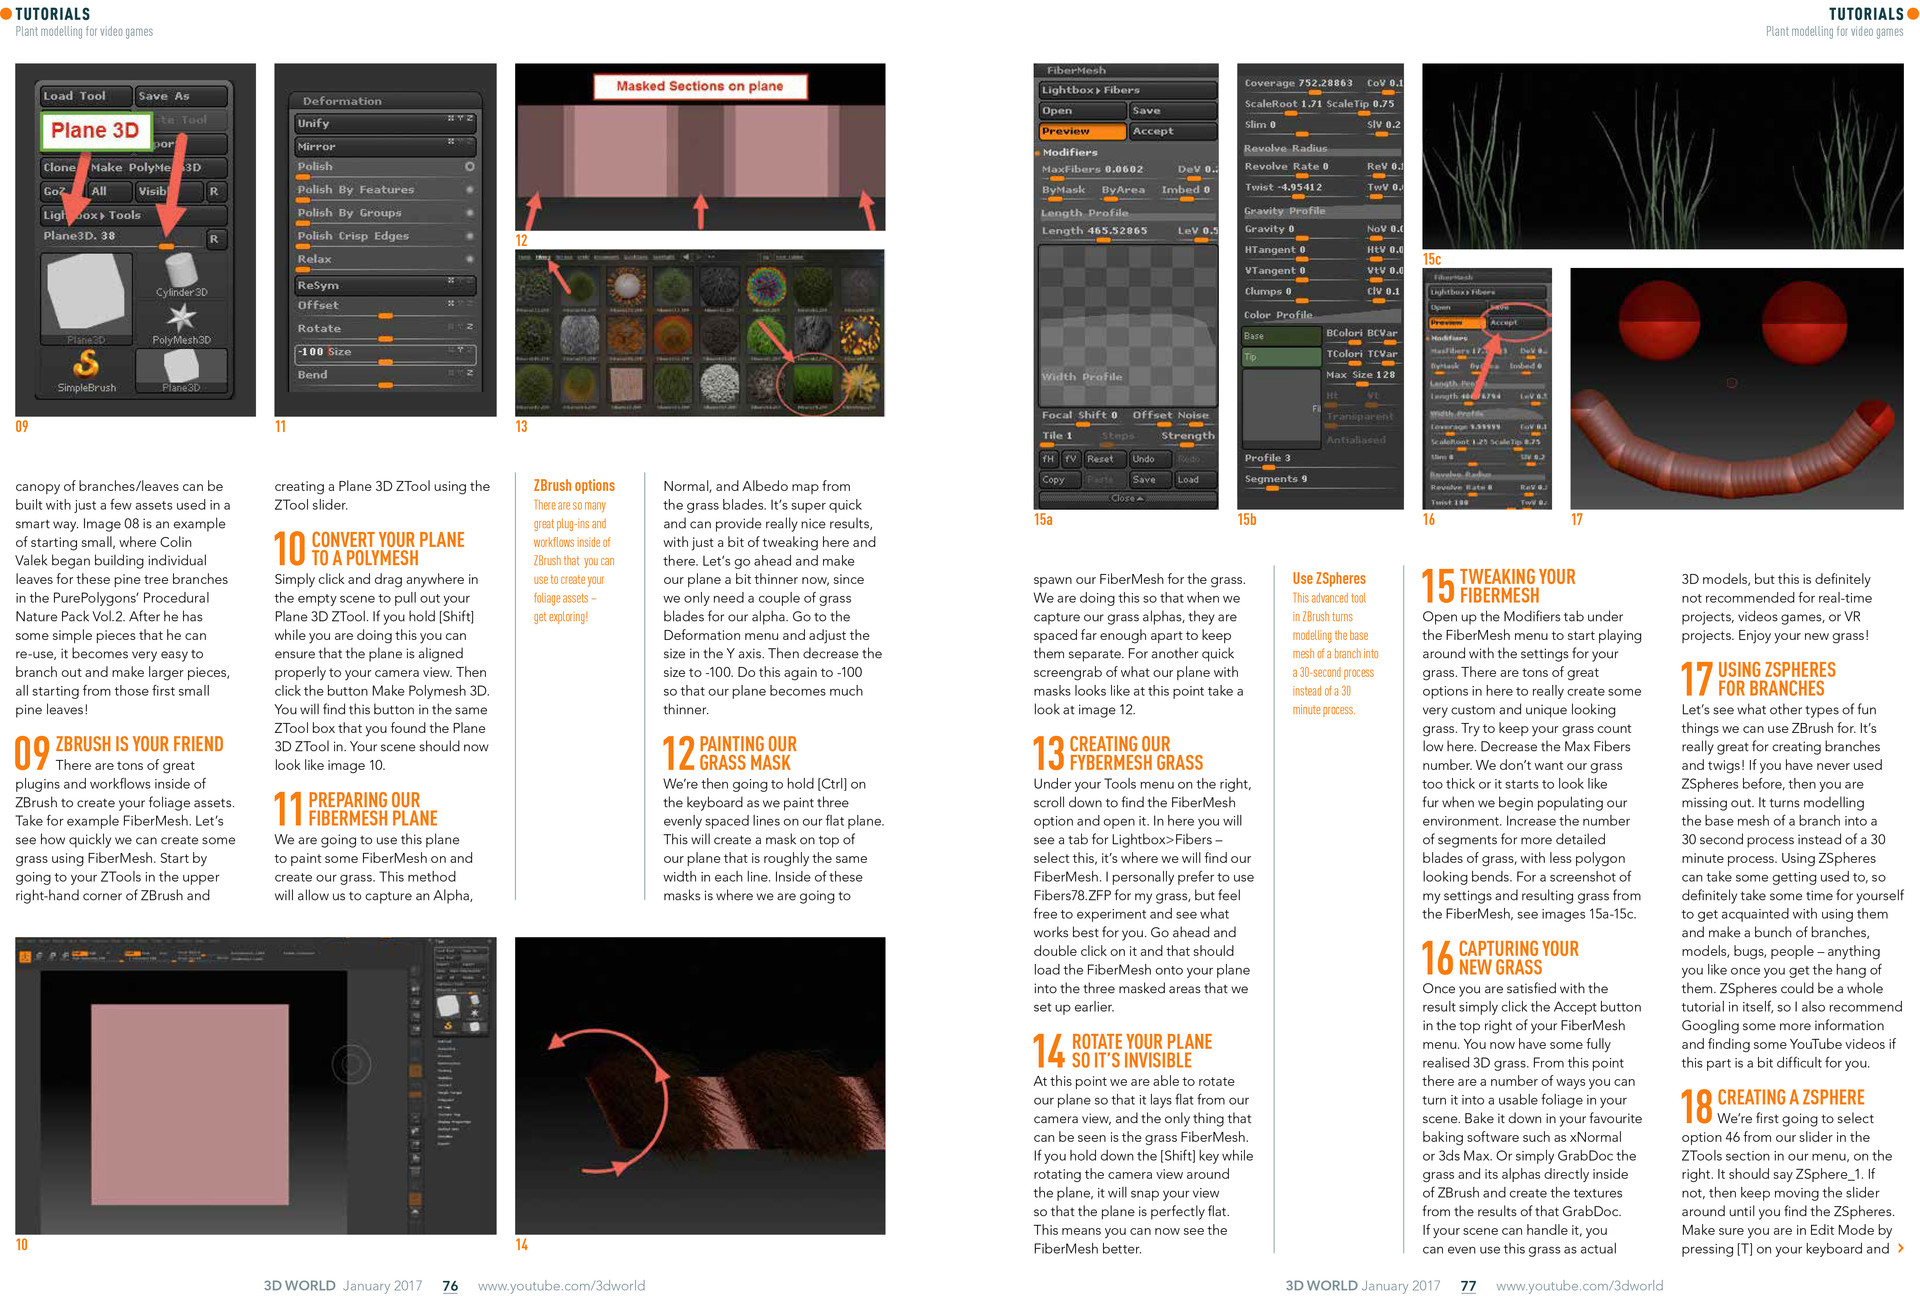
ZBrush에는 폴리지 에셋을 만드는 데 사용할 수 있는 수많은 훌륭한 플러그인과 워크플로우가 있습니다. 예를 들어 FiberMesh를 봅시다. FiberMesh를 사용하여 얼마나 빨리 잔디를 만들 수 있는지 봅시다. ZBrush 우측 상단의 ZTools 섹션으로 이동하여 ZTool 슬라이더를 사용해 Plane 3D ZTool을 생성하는 것으로 시작하세요.
10 Plane을 Polymesh로 변환하기
빈 장면 아무 곳이나 클릭하고 드래그하여 Plane 3D ZTool을 꺼냅니다. 이 작업을 하는 동안 [Shift] 키를 누르고 있으면 플레인이 카메라 뷰에 제대로 정렬되도록 할 수 있습니다. 그런 다음 Make Polymesh 3D 버튼을 클릭합니다. 이 버튼은 Plane 3D ZTool을 찾았던 것과 동일한 ZTool 상자에서 찾을 수 있습니다. 이제 장면은 이미지 10처럼 보여야 합니다.
ZBrush 옵션들
ZBrush에는 폴리지 에셋을 만드는 데 사용할 수 있는 훌륭한 플러그인과 워크플로우가 매우 많습니다 – 탐색해 보세요!
11 FiberMesh Plane 준비하기
우리는 이 플레인을 사용하여 FiberMesh를 칠하고 잔디를 만들 것입니다. 이 방법을 사용하면 잔디 잎에서 알파(Alpha), 노멀(Normal), 알베도(Albedo) 맵을 캡처할 수 있습니다. 이는 매우 빠르며 약간의 조정만으로도 정말 좋은 결과를 제공할 수 있습니다. 이제 알파에는 몇 개의 잔디 잎만 필요하므로 플레인을 좀 더 얇게 만듭시다. Deformation 메뉴로 이동하여 Y축 크기를 조절합니다. 그런 다음 크기를 -100으로 줄입니다. 플레인이 훨씬 얇아지도록 이 과정을 다시 -100으로 반복합니다.
12 잔디 마스크 칠하기
그런 다음 키보드의 [Ctrl] 키를 누른 상태에서 평평한 플레인 위에 균일한 간격의 선 세 개를 칠할 것입니다. 이렇게 하면 각 선이 거의 같은 너비인 마스크가 플레인 위에 생성됩니다. 이 마스크 내부에 FiberMesh 잔디를 생성할 것입니다. 이렇게 하는 이유는 잔디 알파를 캡처할 때 분리된 상태를 유지하기 위해 충분히 떨어져 있도록 하기 위함입니다. 이 시점의 마스크된 플레인 모습에 대한 빠른 스크린샷은 이미지 12를 참조하세요.
13 FiberMesh 잔디 만들기
오른쪽의 Tools 메뉴 아래에서 아래로 스크롤하여 FiberMesh 옵션을 찾고 엽니다. 여기에서 Lightbox>Fibers 탭을 볼 수 있습니다 – 이것을 선택하세요. 여기서 FiberMesh를 찾을 수 있습니다. 저는 개인적으로 잔디에 Fibers78.ZFP를 사용하는 것을 선호하지만, 자유롭게 실험해보고 무엇이 가장 적합한지 확인하세요. 그것을 더블 클릭하면 이전에 설정한 세 개의 마스크 영역에 FiberMesh가 로드될 것입니다.
14 플레인이 보이지 않도록 회전시키기
이 시점에서 카메라 뷰에서 플레인이 평평하게 놓이도록 회전시킬 수 있으며, 보이는 것은 잔디 FiberMesh뿐입니다. 플레인 주위로 카메라 뷰를 회전하는 동안 [Shift] 키를 누르고 있으면 뷰가 스냅되어 플레인이 완벽하게 평평해집니다. 이는 이제 FiberMesh를 더 잘 볼 수 있다는 것을 의미합니다.
ZSphere 사용하기
ZBrush의 이 고급 툴은 가지의 베이스 메시 모델링을 30분 과정 대신 30초 과정으로 바꿔줍니다.
15 FiberMesh 조정하기
FiberMesh 메뉴 아래의 Modifiers 탭을 열어 잔디 설정을 조정하기 시작합니다. 여기에는 매우 맞춤화되고 독특한 모습의 잔디를 만들 수 있는 수많은 훌륭한 옵션들이 있습니다. 여기서는 잔디 수를 낮게 유지하도록 노력하세요. Max Fibers 수를 줄이세요. 잔디가 너무 빽빽하면 환경에 배치하기 시작할 때 털처럼 보이기 시작합니다. 더 세밀하고 각진 굽힘이 적은 잔디 잎을 위해 세그먼트(Segments) 수를 늘리세요. 제 설정과 FiberMesh 결과 잔디의 스크린샷은 이미지 15a-15c를 참조하세요.
16 새로운 잔디 캡처하기
결과에 만족하면 FiberMesh 메뉴 오른쪽 상단의 Accept 버튼을 클릭합니다. 이제 완전히 구현된 3D 잔디가 있습니다. 이 시점부터 이것을 장면에서 사용 가능한 폴리지로 바꾸는 여러 가지 방법이 있습니다. 선호하는 베이킹 소프트웨어(예: xNormal 또는 3ds Max)에서 베이크합니다. 또는 ZBrush 내에서 직접 GrabDoc을 사용하여 잔디와 그 알파를 캡처하고 그 결과로부터 텍스처를 만듭니다. 만약 장면이 감당할 수 있다면, 이 잔디를 실제 지오메트리로 사용할 수도 있습니다.
17 가지에 ZSphere 사용하기
ZBrush를 사용하여 할 수 있는 다른 재미있는 것들이 무엇인지 봅시다. 가지와 잔가지를 만드는 데 정말 좋습니다! 이전에 ZSphere를 사용해 본 적이 없다면, 놓치고 있는 것입니다. ZSphere 사용은 가지의 베이스 메시 모델링을 30분 과정 대신 30초 과정으로 바꿔줍니다. ZSphere 사용은 익숙해지는 데 시간이 걸릴 수 있으므로, 시간을 내어 익숙해지고, 일단 요령을 터득하면 가지, 모델, 벌레, 사람 등 원하는 모든 것을 만들어 보세요. ZSphere는 그 자체로 완전한 튜토리얼이 될 수 있으므로, 이 부분이 조금 어렵다면 구글 검색이나 유튜브 비디오를 통해 더 많은 정보를 찾아보는 것을 추천합니다.
18 ZSphere 생성하기
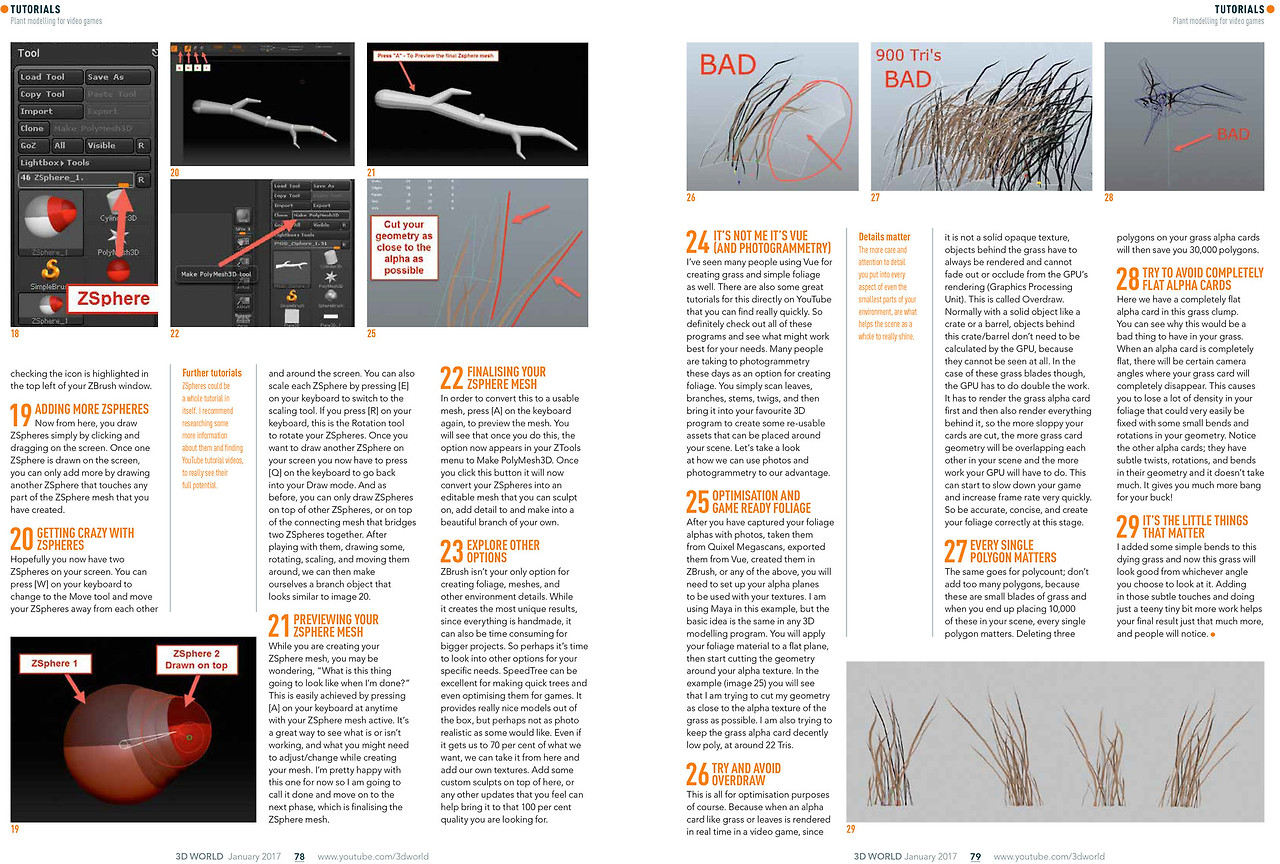
먼저 오른쪽 메뉴의 ZTools 섹션에 있는 슬라이더에서 옵션 46번을 선택합니다. ZSphere_1이라고 표시되어야 합니다. 그렇지 않다면 ZSphere를 찾을 때까지 슬라이더를 계속 움직여 보세요. 키보드의 [T] 키를 눌러 ZBrush 창 왼쪽 상단의 아이콘이 강조 표시되어 있는지 확인하여 Edit Mode(편집 모드)인지 확인합니다.
05 Gather plenty of reference images
This is also extremely crucial to the process of creating a unified environment. Now that you have your plant names, climate, biome, and all of the important information, this is your chance to use it. Search far and wide to find all parts/life cycles of the plant. Find the dead version, the live version, the branches, leaves, dying leaves, possibly eaten leaves, bark, moss growing on the tree, or better yet, if you live near that type of environment go out and take some pictures! Image 05 is an example of some corresponding references for plants within a specific biome.
Be thorough
Search far and wide to find all parts/life cycles of the foliage. Or better yet, if you live near that type of environment, go out and take some pictures!
06 Pick apart your reference
The next step is to start planning out your workflow. You can save yourself a huge amount of time at this stage, because perhaps there are similar leaf types amongst your trees or bushes. Even if they aren’t exactly the same, think of a way that you may be able to slightly alter the leaf you are making to work for your other plants.
07 Don’t Work Harder, Work Smarter
Twigs and branches can usually be shared between many of your plants. Don’t make extra work for yourself and create unique twigs and branches for all of your assets. See if there are similar shapes again between your trees or bushes. Then you can create a simple base mesh branch/twig that can have slight adjustments made to it to change the bark, or to create broken/dead branches. Spread this idea area. All of these details add layers and layers of realism to your scene. It matters.
08 Start Small and Think Modular
Now that you have started to plan your workflow and pick apart your reference images better, it’s time to start modelling. Start small and create some re-usable ZTools or alphas inside of ZBrush, or Mudbox, depending on your software of choice. Create your leaves, flowers, branches and so forth, and then you can start to piece them together to make larger pieces. An entire tree canopy of branches/leaves can be built with just a few assets used in a smart way. Image 08 is an example of starting small, where Colin Valek began building individual leaves for these pine tree branches in the PurePolygons’ Procedural Nature Pack Vol.2. After he has some simple pieces that he can re-use, it becomes very easy to branch out and make larger pieces, all starting from those first small pine leaves!
09 Zbrush is your friend
There are tons of great plugins and workflows inside of ZBrush to create your foliage assets. Take for example FiberMesh. Let’s see how quickly we can create some grass using FiberMesh. Start by going to your ZTools in the upper right-hand corner of ZBrush and creating a Plane 3D ZTool using the ZTool slider.
10 Convert your Plane to a Polymesh
Simply click and drag anywhere in the empty scene to pull out your Plane 3D ZTool. If you hold [Shift] while you are doing this you can ensure that the plane is aligned properly to your camera view. Then click the button Make Polymesh 3D. You will find this button in the same ZTool box that you found the Plane 3D ZTool in. Your scene should now look like image 10.
ZBrush options
There are so many great plug-ins and workflows inside of ZBrush that you can use to create your foliage assets – get exploring!
11 Preparing our Fibermesh Plane
We are going to use this plane to paint some FiberMesh on and create our grass. This method will allow us to capture an Alpha, Normal, and Albedo map from the grass blades. It’s super quick and can provide really nice results, with just a bit of tweaking here and there. Let’s go ahead and make our plane a bit thinner now, since we only need a couple of grass blades for our alpha. Go to the Deformation menu and adjust the size in the Y axis. Then decrease the size to -100. Do this again to -100 so that our plane becomes much thinner.
12 Painting our Grass Mask
We’re then going to hold [Ctrl] on the keyboard as we paint three evenly spaced lines on our flat plane. This will create a mask on top of our plane that is roughly the same width in each line. Inside of these masks is where we are going to spawn our FiberMesh for the grass. We are doing this so that when we capture our grass alphas, they are spaced far enough apart to keep them separate. For another quick screengrab of what our plane with masks looks like at this point take a look at image 12.
13 Creating our fybermesh Grass
Under your Tools menu on the right, scroll down to find the FiberMesh option and open it. In here you will see a tab for Lightbox>Fibers –select this, it’s where we will find our FiberMesh. I personally prefer to use Fibers78.ZFP for my grass, but feel free to experiment and see what works best for you. Go ahead and double click on it and that should load the FiberMesh onto your plane into the three masked areas that we set up earlier.
14 Rotate your Plane so it’s Invisible
At this point we are able to rotate our plane so that it lays flat from our camera view, and the only thing that can be seen is the grass FiberMesh. If you hold down the [Shift] key while rotating the camera view around the plane, it will snap your view so that the plane is perfectly flat. This means you can now see the FiberMesh better.
Use ZSpheres
This advanced tool in ZBrush turns modelling the base mesh of a branch into a 30-second process instead of a 30 minute process.
15 Tweaking your Fibermesh
Open up the Modifiers tab under the FiberMesh menu to start playing around with the settings for your grass. There are tons of great options in here to really create some very custom and unique looking grass. Try to keep your grass count low here. Decrease the Max Fibers number. We don’t want our grass too thick or it starts to look like fur when we begin populating our environment. Increase the number of segments for more detailed blades of grass, with less polygon looking bends. For a screenshot of my settings and resulting grass from the FiberMesh, see images 15a-15c.
16 Capturing your new grass
Once you are satisfied with the result simply click the Accept button in the top right of your FiberMesh menu. You now have some fully realised 3D grass. From this point there are a number of ways you can turn it into a usable foliage in your scene. Bake it down in your favourite baking software such as xNormal or 3ds Max. Or simply GrabDoc the grass and its alphas directly inside of ZBrush and create the textures from the results of that GrabDoc. If your scene can handle it, you can even use this grass as actual Normal, and Albedo map from the grass blades. It’s super quick and can provide really nice results, with just a bit of tweaking here and there. Let’s go ahead and make our plane a bit thinner now, since we only need a couple of grass blades for our alpha. Go to the Deformation menu and adjust the size in the Y axis. Then decrease the size to -100. Do this again to -100 so that our plane becomes much thinner.
17 Using Zspheres for branches
Let’s see what other types of fun things we can use ZBrush for. It’s really great for creating branches and twigs! If you have never used ZSpheres before, then you are missing out. It turns modelling the base mesh of a branch into a 30 second process instead of a 30 minute process. Using ZSpheres can take some getting used to, so definitely take some time for yourself to get acquainted with using them and make a bunch of branches, models, bugs, people –anything you like once you get the hang of them. ZSpheres could be a whole tutorial in itself, so I also recommend Googling some more information and finding some YouTube videos if this part is a bit difficult for you.
18 Creating a Zsphere
We’re first going to select option 46 from our slider in the ZTools section in our menu, on the right. It should say ZSphere_1. If not, then keep moving the slider around until you find the ZSpheres. Make sure you are in Edit Mode by pressing [T] on your keyboard and checking the icon is highlighted in the top left of your ZBrush window.
19 ZSphere 추가하기
이제 화면을 클릭하고 드래그하는 것만으로 ZSphere를 그릴 수 있습니다. 화면에 ZSphere 하나가 그려지면, 이미 생성된 ZSphere 메시의 어느 부분에든 닿도록 다른 ZSphere를 그려야만 더 추가할 수 있습니다.
20 ZSphere 자유롭게 다루기
이제 화면에 두 개의 ZSphere가 있을 것입니다. 키보드의 [W] 키를 눌러 이동 툴로 전환하여 ZSphere들을 서로 떨어뜨리거나 화면 주위로 이동시킬 수 있습니다. 키보드의 [E] 키를 눌러 크기 조절 툴로 전환하면 각 ZSphere의 크기를 조절할 수도 있습니다. 키보드의 [R] 키를 누르면 회전 툴이 되어 ZSphere를 회전시킬 수 있습니다. 화면에 다른 ZSphere를 그리고 싶을 때는 키보드의 [Q] 키를 눌러 다시 드로우 모드로 돌아가야 합니다. 그리고 이전과 마찬가지로, ZSphere는 다른 ZSphere 위나 두 ZSphere를 연결하는 메시 위에만 그릴 수 있습니다. ZSphere를 가지고 놀면서 몇 개를 그리고, 회전하고, 크기를 조절하고, 이동시킨 후에는 이미지 20과 유사한 나뭇가지 오브젝트를 만들 수 있습니다.
추가 튜토리얼
ZSphere는 그 자체만으로도 하나의 완전한 튜토리얼이 될 수 있습니다. ZSphere에 대한 더 많은 정보를 찾아보고 YouTube 튜토리얼 비디오를 검색하여 그 잠재력을 최대한 확인해 보시기를 권장합니다.
21 ZSphere 메시 미리보기
ZSphere 메시를 만드는 동안 “이게 완성되면 어떤 모습일까?” 하고 궁금할 수 있습니다. 이는 ZSphere 메시가 활성화된 상태에서 언제든지 키보드의 [A] 키를 누르면 쉽게 확인할 수 있습니다. 메시를 만드는 동안 무엇이 잘 되고 있고 무엇이 잘 안되는지, 어떤 부분을 조정하거나 변경해야 하는지 확인하는 좋은 방법입니다. 저는 현재 이 상태에 꽤 만족하므로 이 단계는 완료된 것으로 간주하고 다음 단계인 ZSphere 메시 최종화로 넘어가겠습니다.
22 ZSphere 메시 최종화하기
이를 사용 가능한 메시로 변환하려면 키보드의 [A] 키를 다시 눌러 메시를 미리 봅니다. 이렇게 하면 ZTools 메뉴에 Make PolyMesh3D 옵션이 나타나는 것을 볼 수 있습니다. 이 버튼을 클릭하면 ZSphere가 편집 가능한 메시로 변환되어 조각하고, 디테일을 추가하고, 자신만의 아름다운 나뭇가지를 만들 수 있습니다.
23 다른 옵션 탐색하기
폴리지(식물), 메시 및 기타 환경 디테일을 만드는 데 ZBrush만이 유일한 옵션은 아닙니다. 모든 것이 수작업으로 만들어지기 때문에 가장 독특한 결과를 만들어내지만, 대규모 프로젝트에서는 시간이 많이 소요될 수도 있습니다. 따라서 특정 요구 사항에 맞는 다른 옵션을 고려해 볼 때입니다. SpeedTree는 빠른 나무 제작과 게임용 최적화에 탁월할 수 있습니다. 기본적으로 훌륭한 모델을 제공하지만, 일부 사용자가 원하는 만큼 사진처럼 사실적이지는 않을 수 있습니다. 이것이 우리가 원하는 것의 70%를 달성하게 해준다고 해도, 여기서부터 시작하여 우리만의 텍스처를 추가할 수 있습니다. 여기에 커스텀 조각을 덧붙이거나, 여러분이 생각하기에 100% 품질로 끌어올리는 데 도움이 될 수 있는 다른 업데이트를 추가할 수 있습니다.
24 Vue (그리고 포토그래메트리) 활용하기
많은 사람들이 잔디나 간단한 폴리지를 만드는 데 Vue를 사용하는 것을 보았습니다. YouTube에서도 관련 튜토리얼을 매우 빠르게 찾을 수 있으니 꼭 확인해 보세요. 따라서 이러한 모든 프로그램을 확실히 확인하고 자신의 필요에 가장 적합한 것이 무엇인지 알아보십시오. 요즘 많은 사람들이 폴리지를 만드는 옵션으로 포토그래메트리(photogrammetry)를 사용하고 있습니다. 단순히 잎, 가지, 줄기, 잔가지 등을 스캔한 다음, 선호하는 3D 프로그램으로 가져와 씬(scene) 주위에 배치할 수 있는 재사용 가능한 에셋을 만듭니다. 사진과 포토그래메트리를 우리에게 유리하게 활용하는 방법을 살펴보겠습니다.
25 최적화 및 게임용 폴리지 준비
사진으로 폴리지 알파(alpha)를 캡처했거나, Quixel Megascans에서 가져왔거나, Vue에서 익스포트했거나, ZBrush에서 생성했거나, 위의 방법 중 어떤 것을 사용했든, 텍스처와 함께 사용할 알파 평면(alpha plane)을 설정해야 합니다. 이 예에서는 Maya를 사용하고 있지만, 기본적인 아이디어는 어떤 3D 모델링 프로그램에서나 동일합니다. 폴리지 머티리얼을 평평한 평면에 적용한 다음, 알파 텍스처 주위로 지오메트리(geometry)를 잘라내기 시작합니다. 예시(이미지 25)에서 볼 수 있듯이, 저는 지오메트리를 잔디의 알파 텍스처에 최대한 가깝게 자르려고 노력하고 있습니다. 또한 잔디 알파 카드(alpha card)를 약 22 트라이앵글(Tris) 정도로 상당히 로우폴리(low poly) 상태로 유지하려고 합니다.
26 오버드로우(Overdraw) 피하기
이 모든 것은 물론 최적화를 위한 것입니다. 잔디나 잎사귀 같은 알파 카드는 불투명한 솔리드 텍스처가 아니기 때문에 비디오 게임에서 실시간으로 렌더링될 때, 잔디 뒤의 오브젝트는 GPU(그래픽 처리 장치)의 렌더링에서 사라지거나 가려지지 않고(occlude) 항상 렌더링되어야 합니다. 이를 오버드로우(Overdraw)라고 합니다. 일반적으로 상자나 통 같은 솔리드 오브젝트의 경우, 이 오브젝트 뒤에 있는 것들은 전혀 보이지 않기 때문에 GPU가 계산할 필요가 없습니다. 하지만 이 잔디 잎의 경우에는 GPU가 두 배의 작업을 수행해야 합니다. 먼저 잔디 알파 카드를 렌더링한 다음 그 뒤에 있는 모든 것을 렌더링해야 하므로, 카드를 엉성하게 자를수록 씬에서 더 많은 잔디 카드 지오메트리가 서로 겹치게 되고 GPU가 해야 할 작업이 더 많아집니다. 이는 게임 속도를 저하시키고 프레임 속도에 빠르게 영향을 미칠 수 있습니다. 따라서 이 단계에서 정확하고 간결하게 폴리지를 올바르게 만드십시오.
디테일이 중요합니다
환경의 가장 작은 부분 하나하나에 더 많은 관심과 주의를 기울일수록 전체 씬(scene)이 진정으로 빛나는 데 도움이 됩니다.
27 모든 폴리곤이 중요합니다
폴리곤 수(polycount)도 마찬가지입니다. 너무 많은 폴리곤을 추가하지 마십시오. 이것들은 작은 잔디 잎이고, 씬에 이런 것을 10,000개 배치하게 되면 모든 단일 폴리곤이 중요해집니다. 잔디 알파 카드에서 폴리곤 3개를 삭제하면 총 30,000개의 폴리곤을 절약하는 셈입니다.
28 완전히 평평한 알파 카드는 피하세요
여기 이 잔디 덩굴에는 완전히 평평한 알파 카드가 있습니다. 이것이 왜 잔디에 좋지 않은지 알 수 있습니다. 알파 카드가 완전히 평평하면, 특정 카메라 각도에서는 잔디 카드가 완전히 사라져 버릴 수 있습니다. 이로 인해 지오메트리에 약간의 구부림과 회전을 추가하여 매우 쉽게 수정할 수 있었을 폴리지의 밀도(density)를 많이 잃게 됩니다. 다른 알파 카드를 주목하세요. 지오메트리에 미묘한 비틀림, 회전, 구부림이 있으며 많은 노력이 들지 않습니다. 훨씬 더 큰 효과를 얻을 수 있습니다!
29 사소한 디테일이 중요합니다
이 시든 잔디에 간단한 구부림을 추가했더니 이제 이 잔디는 어떤 각도에서 보아도 좋아 보입니다. 이러한 미묘한 손길을 더하고 아주 약간의 추가 작업만으로도 최종 결과물을 훨씬 더 향상시킬 수 있으며, 사람들은 그 차이를 알아챌 것입니다.
19 Adding more Zspheres
Now from here, you draw ZSpheres simply by clicking and dragging on the screen. Once one ZSphere is drawn on the screen, you can only add more by drawing another ZSphere that touches any part of the ZSphere mesh that you have created.
20 Getting Crazy with ZSpheres
Hopefully you now have two ZSpheres on your screen. You can press [W] on your keyboard to change to the Move tool and move your ZSpheres away from each other and around the screen. You can also scale each ZSphere by pressing [E] on your keyboard to switch to the scaling tool. If you press [R] on your keyboard, this is the Rotation tool to rotate your ZSpheres. Once you want to draw another ZSphere on your screen you now have to press [Q] on the keyboard to go back into your Draw mode. And as before, you can only draw ZSpheres on top of other ZSpheres, or on top of the connecting mesh that bridges two ZSpheres together. After playing with them, drawing some, rotating, scaling, and moving them around, we can then make ourselves a branch object that looks similar to image 20.
Further tutorials
ZSpheres could be a whole tutorial in itself. I recommend researching some more information about them and finding YouTube tutorial videos, to really see their full potential.
21 Previewing your ZSphere Mesh
While you are creating your ZSphere mesh, you may be wondering, “What is this thing going to look like when I’m done?” This is easily achieved by pressing [A] on your keyboard at anytime with your ZSphere mesh active. It’s a great way to see what is or isn’t working, and what you might need to adjust/change while creating your mesh. I’m pretty happy with this one for now so I am going to call it done and move on to the next phase, which is finalising the ZSphere mesh.
22 Finalising your ZSphere Mesh
In order to convert this to a usable mesh, press [A] on the keyboard again, to preview the mesh. You will see that once you do this, the option now appears in your ZTools menu to Make PolyMesh3D. Once you click this button it will now convert your ZSpheres into an editable mesh that you can sculpt on, add detail to and make into a beautiful branch of your own.
23 Explore other options
ZBrush isn’t your only option for creating foliage, meshes, and other environment details. While it creates the most unique results, since everything is handmade, it can also be time consuming for bigger projects. So perhaps it’s time to look into other options for your specific needs. SpeedTree can be excellent for making quick trees and even optimising them for games. It provides really nice models out of the box, but perhaps not as photo realistic as some would like. Even if it gets us to 70 per cent of what we want, we can take it from here and add our own textures. Add some custom sculpts on top of here, or any other updates that you feel can help bring it to that 100 per cent quality you are looking for.
24 It’s not me it’s Vue (and Photogrammetry)
I’ve seen many people using Vue for creating grass and simple foliage as well. There are also some great tutorials for this directly on YouTube that you can find really quickly. So definitely check out all of these programs and see what might work best for your needs. Many people are taking to photogrammetry these days as an option for creating foliage. You simply scan leaves, branches, stems, twigs, and then bring it into your favourite 3D program to create some re-usable assets that can be placed around your scene. Let’s take a look at how we can use photos and photogrammetry to our advantage.
25 Optimisation and Game Ready Foliage
After you have captured your foliage alphas with photos, taken them from Quixel Megascans, exported them from Vue, created them in ZBrush, or any of the above, you will need to set up your alpha planes to be used with your textures. I am using Maya in this example, but the basic idea is the same in any 3D modelling program. You will apply your foliage material to a flat plane, then start cutting the geometry around your alpha texture. In the example (image 25) you will see that I am trying to cut my geometry as close to the alpha texture of the grass as possible. I am also trying to keep the grass alpha card decently low poly, at around 22 Tris.
26 try and avoid Overdraw
This is all for optimisation purposes of course. Because when an alpha card like grass or leaves is rendered in real time in a video game, since it is not a solid opaque texture, objects behind the grass have to always be rendered and cannot fade out or occlude from the GPU’s rendering (Graphics Processing Unit). This is called Overdraw. Normally with a solid object like a crate or a barrel, objects behind this crate/barrel don’t need to be calculated by the GPU, because they cannot be seen at all. In the case of these grass blades though, the GPU has to do double the work. It has to render the grass alpha card first and then also render everything behind it, so the more sloppy your cards are cut, the more grass card geometry will be overlapping each other in your scene and the more work your GPU will have to do. This can start to slow down your game and increase frame rate very quickly. So be accurate, concise, and create your foliage correctly at this stage.
Details matter
The more care and attention to detail you put into every aspect of even the smallest parts of your environment, are what helps the scene as a 18 whole to really shine.
27 Every Single Polygon Matters
The same goes for polycount; don’t add too many polygons, because these are small blades of grass and when you end up placing 10,000 of these in your scene, every single polygon matters. Deleting three polygons on your grass alpha cards will then save you 30,000 polygons.
28 Try to avoid completely flat alpha cards
Here we have a completely flat alpha card in this grass clump. You can see why this would be a bad thing to have in your grass. When an alpha card is completely flat, there will be certain camera angles where your grass card will completely disappear. This causes you to lose a lot of density in your foliage that could very easily be fixed with some small bends and rotations in your geometry. Notice the other alpha cards; they have subtle twists, rotations, and bends in their geometry and it doesn’t take much. It gives you much more bang for your buck!
29 It’s the Little Things That Matter
I added some simple bends to this dying grass and now this grass will look good from whichever angle you choose to look at it. Adding in those subtle touches and doing just a teeny tiny bit more work helps your final result just that much more, and people will notice.
식생 만드는 중이라 공부겸 백업,,
'3D > 공부 메모' 카테고리의 다른 글
| 의식의 흐름) AI를 3D작업에 어떻게 활용할 수 있을까 (15) | 2025.08.17 |
|---|---|
| highpass 관련 메모 (7) | 2025.05.25 |
| 맥스에서 버텍스 사라짐 / 버텍스 없이 엣지만 보일때 해결법 (3ds max) (0) | 2025.04.08 |
| 맥스파일 다른 버전으로 저장하는 법 (3ds max) (0) | 2025.04.08 |
| 3ds max와 언리얼/유니티 엔진 버텍스 갯수가 다른 이유 (1) | 2025.04.04 |


